简介
k8s 缺一个存储,然后看了一下k8s支持的存储,去除掉ceph,nfs,然后各种云上支持的存储,留下来可以操作的貌似就只有glusterfs,所以就研究下glusterfs吧
准备硬盘
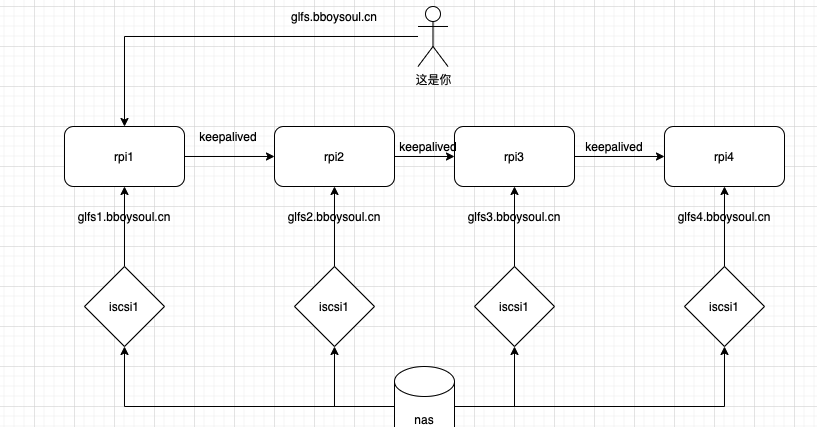
glusterfs要求的硬盘有点多的,但是实际上我是没有那么多硬盘的,但是好在我有一个nas,可以直接创建iscsi硬盘来使用,详细的操作就是4个树莓派,每个树莓派挂上一个iscsi硬盘,如果想要知道怎么操作iscsi硬盘可以看我下面的博客
编译glusterfs
因为是arm平台,所以需要编译源码安装
首先下载代码
wget https://github.com/gluster/glusterfs/archive/refs/tags/v8.4.zip
解压
unzip v8.4.zip
编译
./autogen.sh
提示要安装下面这些工具
apt install autoconf automake libtool
之后configure
./configure --prefix=/data/glusterfs/
下面是连续报错,安装对应的依赖就可以了
configure: error: Flex or lex required to build glusterfs.
apt install flex
configure: error: GNU Bison required to build glusterfs.
apt install bison
configure: error: libuuid is required to build glusterfs
apt install uuid-dev -y
configure: error: Support for POSIX ACLs is required
apt install libacl1-dev
configure: error: libxml2 devel libraries not found
apt install libxml2-dev
configure: error: liburcu-bp not found
apt install liburcu-dev -y
总结下要安装的包
apt install libacl1-dev bison uuid-dev libxml2-dev liburcu-dev -y
之后make
make -j 4
安装
make install
因为是在树莓派上跑的,所以速度会有点慢
接着启动这些节点
cd /data/glusterfs && sbin/glusterd
如果你在第一个节点编译的,之后你把二进制文件复制到第二个节点,然后发生下面报错
[2021-03-25 08:14:25.981155] E [MSGID: 101002] [graph.y:214:volume_type] 0-parser: Volume 'management', line 2: type 'mgmt/glusterd' is not valid or not found on this machine
[2021-03-25 08:14:25.981291] E [MSGID: 101019] [graph.y:322:volume_end] 0-parser: "type" not specified for volume management
[2021-03-25 08:14:25.981466] E [MSGID: 100026] [glusterfsd.c:2485:glusterfs_process_volfp] 0-: failed to construct the graph []
[2021-03-25 08:14:25.982012] W [MSGID: 100032] [glusterfsd.c:1439:cleanup_and_exit] 0-: received signum (-1), shutting down
[2021-03-25 08:16:17.192893] I [MSGID: 100030] [glusterfsd.c:2689:main] 0-sbin/glusterd: Started running version [{arg=sbin/glusterd}, {version=2021.03.25}, {cmdlinestr=sbin/glusterd}]
emmm,其实我也不知道上面错的原因是什么,但是我把之前安装的依赖全部重新安装了一遍就ok了
apt install libacl1-dev bison uuid-dev libxml2-dev liburcu-dev -y
设置dns解析
如果你家里面有dns服务器那么就设置下dns解析,如果没有那就只能设置hosts了,只要可以相互访问就可以了,我设置的解析如下
address /glfs1.bboysoul.cn/10.10.100.10
address /glfs2.bboysoul.cn/10.10.100.11
address /glfs3.bboysoul.cn/10.10.100.12
address /glfs4.bboysoul.cn/10.10.100.13
address /glfs.bboysoul.cn/10.10.100.245
配置受信任的池
在节点1执行
./gluster peer probe glfs2.bboysoul.cn
如果出现
peer probe: success
那就ok了
因为我有四个节点,所以节点1要执行下面命令
./gluster peer probe glfs2.bboysoul.cn
./gluster peer probe glfs3.bboysoul.cn
./gluster peer probe glfs4.bboysoul.cn
之后在节点2中查看集群状态
➜  sbin ./gluster peer status
Number of Peers: 3

Hostname: reg.bboysoul.cn
Uuid: b9e85704-bb5e-4487-94e5-fb24a2955d39
State: Peer in Cluster (Connected)

Hostname: glfs2.bboysoul.cn
Uuid: 568c17ec-3e95-4d8e-984c-5a11e2aa3497
State: Peer in Cluster (Connected)

Hostname: glfs3.bboysoul.cn
Uuid: 8c7f0ffc-0048-4996-bdfc-fa67b68a4bc2
State: Peer in Cluster (Connected)
发现节点1的hostname是有问题的,所以需要移除节点1,然后重新添加
./gluster peer detach reg.bboysoul.cn
./gluster peer probe glfs1.bboysoul.cn
之后查看集群的状态
➜  sbin ./gluster peer status
Number of Peers: 3

Hostname: glfs2.bboysoul.cn
Uuid: 568c17ec-3e95-4d8e-984c-5a11e2aa3497
State: Peer in Cluster (Connected)

Hostname: glfs3.bboysoul.cn
Uuid: 8c7f0ffc-0048-4996-bdfc-fa67b68a4bc2
State: Peer in Cluster (Connected)

Hostname: glfs1.bboysoul.cn
Uuid: b9e85704-bb5e-4487-94e5-fb24a2955d39
State: Peer in Cluster (Connected)
创建volume
首先说下volume的类型,其实只要知道四种基本的volume就可以了
- distribute volume:分布式卷
文件通过hash算法分布到所有的服务器上,比如你创建了两个文件a 和b,那么a可能在serve a,b可能在server b.但是如果server a挂了,那么就读取不到server a中的a文件了,但是server b中的b文件还是存在的。相当于raid 0,没有容错能力
使用下面命令创建分布式券
./gluster volume create distribute-volume glfs{1..4}.bboysoul.cn:/glusterdata/distribute-volume
- stripe volume:条带卷
glusterfs6的时候就已经丢弃了条带券,所以最新版本是没有stripe volume的,但是会有Dispersed volume,条带卷就是把文件分成数据块以Round Robin方式分布到服务器上,因为是数据块,所以对于大文件的读取比较友好,也类似raid 0 ,一个节点出问题后文件就不能读取了
- replica volume:复制卷
听这名字就知道,这种类型的volume会把文件复制到多个服务器上,类似raid 1,有容错能力
./gluster volume create replica-volume replica 4 glfs{1..4}.bboysoul.cn:/glusterdata/replica-volume
- Dispersed volume: 纠错卷
可以理解成raid5/6,在写入文件的时候每个文件会分割成Chunk,而Chunk会分割成fragment,同时对应的带有冗余信息的fragment也随之生成,同一个fragment只会保存在一个Brick上
./gluster volume create dispersed-volume disperse 4 glfs{1..4}.bboysoul.cn:/glusterdata/dispersed-volume
创建volume
./gluster volume create test1 replica 4 glfs{1..4}.bboysoul.cn:/glusterdata/test1
启动volume
./gluster volume start test1
挂载volume
mount -t glusterfs glfs1.bboysoul.cn:/test1 ./test
如果提示
mount: /root/test: unknown filesystem type 'glusterfs'.
安装下面这个包
apt install glusterfs-client
测试一下性能
for i in seq -w 1 1000; do cp -rp /var/log/messages ./copy-test-$i; done
高可用
高可用的话肯定要用上我们的keepalived了
每个节点都要安装keepalived
ansible rpi -i hosts.yaml -m shell -a "apt install keepalived -y"
ansible rpi -i hosts.yaml -m shell -a "systemctl enable keepalived"
ansible rpi -i hosts.yaml -m shell -a "systemctl start keepalived"
之后就是配置keepalived
master节点
! Configuration File for keepalived

global_defs {
   router_id glusterfs
}

vrrp_script chk_glusterfs {
    script "/etc/keepalived/check.sh"
    interval 5
    weight -40
}

vrrp_instance VI_1 {
    state MASTER
    interface eth0
    virtual_router_id 99
    priority 100
    #advert_int 5
    authentication {
        auth_type PASS
        auth_pass bboysoul
    }
    virtual_ipaddress {
        10.10.100.245
    }
    track_script {
        chk_glusterfs
    }
    notify_master "/bin/bash /etc/keepalived/alert.sh"
    notify_backup "/bin/bash /etc/keepalived/alert.sh"
    notify_fault "/bin/bash /etc/keepalived/alert.sh"
}
检查存活的脚本,就是检查这个进程存不存在
cat check.sh
#!/bin/bash

num=$(netstat -lnupt |grep glusterd | wc -l)
if [ $num -eq 0 ];then
	exit 1;
fi
告警的脚本 我这里使用的是PrometheusAlert这个项目做的中转,直接一个post请求搞定,效果就是直接发送到丁丁告警信息
#!/bin/bash
curl --location --request POST 'http://10.10.100.41:8081/prometheus/alert' \
--header 'Content-Type: application/json' \
--data-raw '{
    "alerts": [
        {
            "annotations": {
                "description": "glusterfs 出问题了!!!!!!!!!"
            }
        }
    ]
}'
备节点的配置
! Configuration File for keepalived

global_defs {
   router_id glusterfs
}

vrrp_script chk_glusterfs {
    script "/etc/keepalived/check.sh"
    interval 5
    weight -40
}

vrrp_instance VI_1 {
    state BACKUP
    interface eth0
    virtual_router_id 99
    priority 90 # 第三个节点-10 以此类推
    #advert_int 5
    authentication {
        auth_type PASS
        auth_pass bboysoul
    }
    virtual_ipaddress {
        10.10.100.245
    }
    track_script {
        chk_glusterfs
    }
    notify_master "/bin/bash /etc/keepalived/alert.sh"
    notify_backup "/bin/bash /etc/keepalived/alert.sh"
    notify_fault "/bin/bash /etc/keepalived/alert.sh"
}
因为每个节点的比重相差了10,所以这里我给的weight -40
之后去每一个节点测试,看看ip会不会漂移
之后dns上添加解析
address /glfs.bboysoul.cn/10.10.100.245
接着使用glfs.bboysoul.cn这个域名去挂载就OK了
mount -t glusterfs glfs.bboysoul.cn:/test1 ./test
其他常用操作
停止一个volume
sbin/gluster volume stop test1
删除volume
sbin/gluster volume delete test1
查看volume状态
./gluster volume status all
欢迎关注我的博客www.bboy.app
Have Fun
