简介
kind是一个在本地使用容器当做节点快速搭建kubernetes的工具,kind最主要用来在本地测试kubernetes
个人觉得,用来玩测试测试k8s资源yaml文件还是可以的,尤其是当你想要体验新版本kubernetes的时候,这是一个最快速的方式
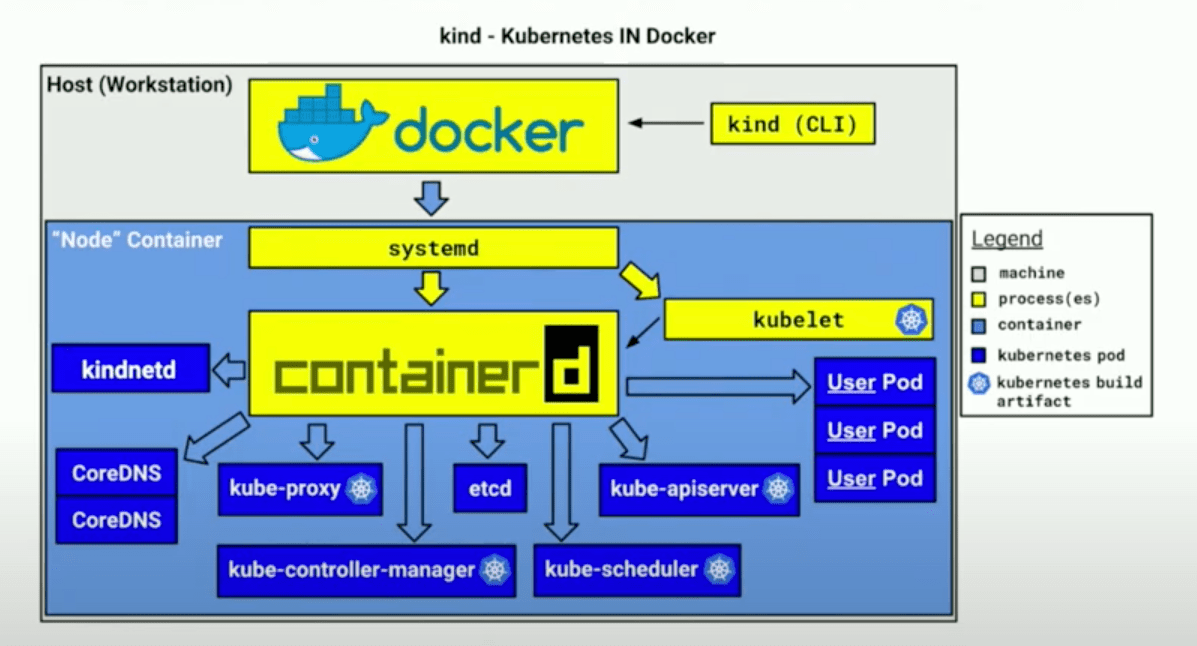
项目架构

项目地址
https://github.com/kubernetes-sigs/kind
下载kind
kind和大部分go语言开发的程序一样,都是一个二进制包,直接下载使用就好了
wget https://github.com/kubernetes-sigs/kind/releases/download/v0.7.0/kind-darwin-amd64
mv kind-darwin-amd64 ~/bin/kind
chmod +x ~/bin/kind
创建一个集群
kind create cluster
如果你看到下面的输出就表示集群启动成功
➜  Downloads kind create cluster
Creating cluster "kind" ...
 ✓ Ensuring node image (kindest/node:v1.17.0) 🖼
 ✓ Preparing nodes 📦
 ✓ Writing configuration 📜
 ✓ Starting control-plane 🕹️
 ✓ Installing CNI 🔌
 ✓ Installing StorageClass 💾
Set kubectl context to "kind-kind"
You can now use your cluster with:

kubectl cluster-info --context kind-kind

Not sure what to do next? 😅 Check out https://kind.sigs.k8s.io/docs/user/quick-start/
默认kind会把集群命名为kind,如果你想自定义名字你可以使用–name参数
kind create cluster --name bboysoul
之后我们查看所有的集群
kind get clusters
➜  Downloads kind get clusters
bboysoul
kind
这样我们就有两个不同名字的集群了
之后
删除我们之前创建的两个节点
kind delete cluster --name bboysoul
kind delete cluster --name kind
高可用
目前我们的kind集群都是单节点的,现在我们要部署3个控制平面和3个工作节点
kind支持使用yaml文件配置集群
vim kind-config.yaml
# a cluster with 3 control-plane nodes and 3 workers
kind: Cluster
apiVersion: kind.x-k8s.io/v1alpha4
nodes:
- role: control-plane
- role: control-plane
- role: control-plane
- role: worker
- role: worker
- role: worker
使用下面命令创建
kind create cluster --config kind-config.yaml --name bboysoul
➜  Downloads kind create cluster --config kind-config.yaml --name bboysoul
Creating cluster "bboysoul" ...
 ✓ Ensuring node image (kindest/node:v1.17.0) 🖼
 ✓ Preparing nodes 📦 📦 📦 📦 📦 📦
 ✓ Configuring the external load balancer ⚖️
 ✓ Writing configuration 📜
 ✓ Starting control-plane 🕹️
 ✓ Installing CNI 🔌
 ✓ Installing StorageClass 💾
 ✓ Joining more control-plane nodes 🎮
 ✓ Joining worker nodes 🚜
Set kubectl context to "kind-bboysoul"
You can now use your cluster with:

kubectl cluster-info --context kind-bboysoul

Have a question, bug, or feature request? Let us know! https://kind.sigs.k8s.io/#community 🙂
查看所有节点
kind get nodes --name bboysoul
➜  Downloads kind get nodes --name bboysoul
bboysoul-external-load-balancer
bboysoul-worker
bboysoul-control-plane3
bboysoul-control-plane2
bboysoul-control-plane
bboysoul-worker2
bboysoul-worker3
使用kubectl查看所有节点
kubectl config use-context kind-bboysoul
kubectl get node
➜  Downloads kubectl get node
NAME                      STATUS   ROLES    AGE   VERSION
bboysoul-control-plane    Ready    master   53m   v1.17.0
bboysoul-control-plane2   Ready    master   52m   v1.17.0
bboysoul-control-plane3   Ready    master   51m   v1.17.0
bboysoul-worker           Ready    <none>   50m   v1.17.0
bboysoul-worker2          Ready    <none>   50m   v1.17.0
bboysoul-worker3          Ready    <none>   50m   v1.17.0
可以看到目前的版本是v1.17.0,但是目前最新的k8s版本是v1.18.0所以我们就要指定镜像,修改yaml文件如下
# a cluster with 3 control-plane nodes and 3 workers
kind: Cluster
apiVersion: kind.x-k8s.io/v1alpha4
nodes:
- role: control-plane
  image: kindest/node:v1.18.0
- role: control-plane
  image: kindest/node:v1.18.0
- role: control-plane
  image: kindest/node:v1.18.0
- role: worker
  image: kindest/node:v1.18.0
- role: worker
  image: kindest/node:v1.18.0
- role: worker
  image: kindest/node:v1.18.0
删除原来的集群
kind delete cluster --name bboysoul
重新部署
kind create cluster --config kind-config.yaml --name bboysoul
➜  Downloads kind create cluster --config kind-config.yaml --name bboysoul
Creating cluster "bboysoul" ...
 ✓ Ensuring node image (kindest/node:v1.18.0) 🖼
 ✓ Preparing nodes 📦 📦 📦 📦 📦 📦
 ✓ Configuring the external load balancer ⚖️
 ✓ Writing configuration 📜
 ✓ Starting control-plane 🕹️
 ✓ Installing CNI 🔌
 ✓ Installing StorageClass 💾
 ✓ Joining more control-plane nodes 🎮
 ✓ Joining worker nodes 🚜
Set kubectl context to "kind-bboysoul"
You can now use your cluster with:

kubectl cluster-info --context kind-bboysoul

Thanks for using kind! 😊
可以看到这个时候就在提示使用的是v1.18.0镜像
其他yaml文件的详细配置可以看下面这里
https://kind.sigs.k8s.io/docs/user/configuration/
➜  Downloads kubectl get nodes
NAME                      STATUS   ROLES    AGE     VERSION
bboysoul-control-plane    Ready    master   11m     v1.18.0
bboysoul-control-plane2   Ready    master   10m     v1.18.0
bboysoul-control-plane3   Ready    master   8m53s   v1.18.0
bboysoul-worker           Ready    <none>   8m14s   v1.18.0
bboysoul-worker2          Ready    <none>   8m16s   v1.18.0
bboysoul-worker3          Ready    <none>   8m15s   v1.18.0
之后删除刚才搭建的集群
kind delete cluster --name bboysoul
搭建ingress
在创建ingress之前我们还是要修改部署集群的yaml文件
# a cluster with 3 control-plane nodes and 3 workers
kind: Cluster
apiVersion: kind.x-k8s.io/v1alpha4
nodes:
- role: control-plane
  kubeadmConfigPatches:
  - |
    kind: InitConfiguration
    nodeRegistration:
      kubeletExtraArgs:
        node-labels: "ingress-ready=true"
        authorization-mode: "AlwaysAllow"
  extraPortMappings:
  - containerPort: 80
    hostPort: 80
    protocol: TCP
  - containerPort: 443
    hostPort: 443
    protocol: TCP
  image: kindest/node:v1.18.0
- role: control-plane
  image: kindest/node:v1.18.0
- role: control-plane
  image: kindest/node:v1.18.0
- role: worker
  image: kindest/node:v1.18.0
- role: worker
  image: kindest/node:v1.18.0
- role: worker
  image: kindest/node:v1.18.0
其实就是在node1上添加kubeadm的配置和把容器的端口映射出来
创建集群
kind create cluster --config kind-config.yaml --name bboysoul
部署完成之后你可以
docker ps
165b3c02fc0d kindest/node:v1.18.0 "/usr/local/bin/entr…" 5 minutes ago Up 4 minutes 0.0.0.0:80->80/tcp, 0.0.0.0:443->443/tcp, 127.0.0.1:32775->6443/tcp bboysoul-control-plane
有一个节点就把端口暴露出来了
之后部署Ingress NGINX
kubectl apply -f https://raw.githubusercontent.com/kubernetes/ingress-nginx/nginx-0.30.0/deploy/static/mandatory.yaml
使用nodeport暴露nginx端口
kubectl apply -f https://raw.githubusercontent.com/kubernetes/ingress-nginx/nginx-0.30.0/deploy/static/provider/baremetal/service-nodeport.yaml
添加nginx的端口配置
kubectl patch deployments -n ingress-nginx nginx-ingress-controller -p '{"spec":{"template":{"spec":{"containers":[{"name":"nginx-ingress-controller","ports":[{"containerPort":80,"hostPort":80},{"containerPort":443,"hostPort":443}]}],"nodeSelector":{"ingress-ready":"true"},"tolerations":[{"key":"node-role.kubernetes.io/master","operator":"Equal","effect":"NoSchedule"}]}}}}'
就是添加hostPort配置
部署一个测试程序
kubectl apply -f https://kind.sigs.k8s.io/examples/ingress/usage.yaml
之后访问
curl localhost/bar
curl localhost/foo
搭建一个nginx服务测试
下面是我的yaml文件
kind: Pod
apiVersion: v1
metadata:
  name: nginx
  labels:
    app: nginx
spec:
  containers:
    - image:  nginx:latest
      name:  nginx
---
kind: Service
apiVersion: v1
metadata:
  name: nginx
spec:
  selector:
    app: nginx
  ports:
  - port: 80
---
apiVersion: extensions/v1beta1
kind: Ingress
metadata:
  name: example-ingress
  annotations:
    ingress.kubernetes.io/rewrite-target: /
spec:
  rules:
  - host: nginx.bboysoul.cn
    http:
      paths:
      - backend:
          serviceName: nginx
          servicePort: 80
直接部署
kubectl apply -f nginx.yaml
之后再hosts里面绑定
127.0.0.1 nginx.bboysoul.cn
接着访问
curl nginx.bboysoul.cn
成功
欢迎关注我的博客www.bboy.app
Have Fun
